Full Admin Guide Safe365

Written by Maddie Kidd
Updated at October 7th, 2025
Table of Contents
Safe365 is a platform to help you access, improve and monitor your organisations health, safety & well-being capability, culture, performance, and engagement. Safer workforce. Better business.
Getting Help with Safe365
Our Help Centre has numerous resources for each functionality across the Safe365 platform. Here you can also search anything in the platform to access resources fast and easily.
Customer Support
There is always the Customer Success team who is on board to help with those more specific or technical questions.
They can be reached at support@safe365global.com. The team are available for your queries and will direct users to our Help Centre for the more common questions.
Safety Maturity Assessment
Safety maturity profiling, governance & continual improvement.
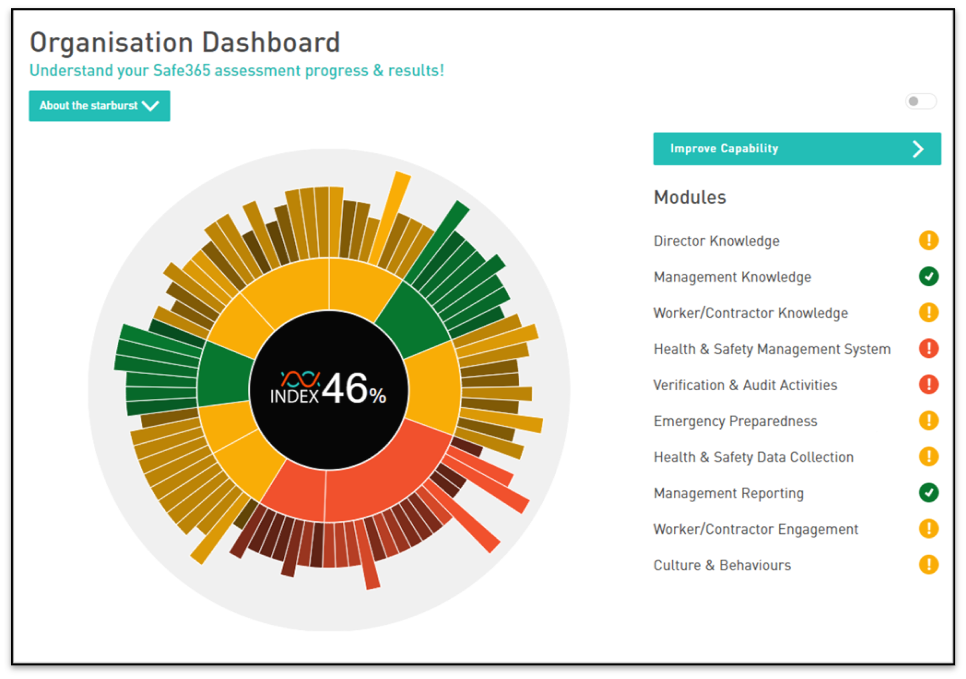
This forms the base of Safe365 and focuses on continual improvement and growth of health and safety capability. Safe365 has curated 10 modules with a total of 85 elements designed to give a complex overview of the business’s health and safety status, represented by the Safety Index score.
The starburst gives you a visual aid for which areas need attention the most, and
This is designed to be updated as improvements in areas are made
More about the Safety Index
Safety maturity self-assessment that results in your business safety index with a dashboard view detailing areas of strengths and areas for continual improvement focus.
Business intelligence that informs decision-making & improves safety leadership
For all Maturity Assessment guides, you can find them here.
Making Changes to Assessment Questions
The Safe365 assessment gives a place to continually improve your health & safety capability.
It Is designed for you to be constantly reviewing and working on the next most important areas. Once you do work on an area and have made improvements, head into that question and adjust the response to the question.
It is important for you as a business to be constantly reviewing and updating the answer to each of the questions.
This is easily done by clicking into an element and selecting the answer where all justifications are met.
You can then track the changes that have been made over a period of time inside the product.
Safety Culture Index Guide
The Safe365 Safety Culture Maturity Index is a data-driven, continuously updated measure of how effectively safety is embedded across an organisation, used to identify gaps, prioritise action, and track improvement over time.
Overview of the Safe365 Safety Culture Maturity Assessment
This video provides a high-level overview of Safe365 explaining its purpose. This onboarding video is used to inform wider audiences about the Safe365 project starting in their organisation.
What does the Safety Index mean?
The Safety Index is a lead indicator providing insights into the organisation’s overall health and safety capability.

Making Changes to an Assessment Question
Making Changes to Safety Index Answers
As you move through your strategic plans, you will need to update the responses to your assessment questions. This can be done at any stage.
To make changes to the Safety Index:
- Select the element you wish to change.
- Select the rater that now applies.
The Safety Index will automatically recalculate.
Accessing Guidance
Generating an Assessment Summary and Guidance
If you haven't read through our announcement - Introducing Safe365 AI - Turning Results into Clarity and Direction - Safe365
You can easily generate your Assessment Summary and start receiving intelligent insights based off your Assessment results, tailored to your organisation.
Assessment Summary
Generate Your Assessment Executive Summary
Purpose: Turn your overall assessment result into a clear, executive-ready narrative you can use for reporting, governance, and board discussions, without specialist interpretation.
When to use this
- You have completed an assessment and want a plain-language summary of where your safety culture sits
- You need a defensible starting point for a leadership or board conversation
- You want to surface top strengths and priority focus areas quickly
What you get
A narrative covering the current state of your safety culture in plain language, the key strengths, and the areas that matter most right now. It is written to be shared as-is with leaders who were not involved in the assessment.
And don't forget for specific guidance on the elements referenced, you can generate Element-Level Guidance.
Generate you Executive Summary
- Click into the ‘Assessment’ Tab
- Click 'Generate Executive Summary'
- When generated, click 'View More'
- Review your insights, use the Copy option to insert into reports
- When changes are made, click 'Refresh' to generate updated insights.
Generating Module Summaries
Generate Module Summaries
Purpose: Get a focused summary for a single module so you can understand that area in isolation and decide where to start.
When to use this
- The overall summary has pointed you toward a module you want to understand in more depth
- You need to brief a team or owner responsible for one specific area
- You want to compare priorities across modules before committing to a focus
What you get
A plain-language read on that module's current state, what is working, and where the priority gaps sit. Useful for handing a single area to the person or team who owns it.
And don't forget for specific guidance on the elements referenced, you can generate Element Level Guidance.
Generate Module Summaries
- Click into any Module
- Click ‘Generate Module Summary’ and wait for the module summary to compile
- Review the module-specific strengths and focus areas
Generating Element Level Guidance
Generate Element-Level Guidance
Purpose: Get practical, actionable guidance on what is typically required to move a specific element up to its next Level or Rater.
When to use this
- You know which element you want to improve and need to understand what "better" looks like
- Your team needs clarity on what change is required, not just that change is needed
- You are building an improvement plan and want a practical reference point per element
What you get
A clear explanation of what progress looks like for that element and the practical steps usually needed to advance it, written to support planning and team discussion.
Start with the elements flagged as priorities in your assessment or module summary. Where guidance points to deeper work, use it to scope where leadership focus or specialist support is needed.
Generate Element-Level Guidance
- Click into an individual Element
- Click ‘Generate Guidance’
- Review the actionable steps describing what is typically required to reach the next Level or Rater.
Adding Notes when making Assessment Changes
Adding Notes in the Maturity Assessment
It is best practice to add a note when making changes to an assessment question. This gives visibility for other users to see the justification for the change in rater and helps satisfy the ability to review and audit all answers.
To Add a Note when completing or changing an Assessment Question:
- On a completed assessment, click into an element.
- Click ‘Add Note’ and enter the reason for changing.
- Change the Rater.
When completing the assessment for the first time, you are able to add notes as you work through the questions.
Adding Actions to Elements
Adding an Action in the Safe365 Maturity Assessment
You can set up Actions within your Safe365 Maturity Assessment, these could be reminders or tasks. These Actions can also be assigned to other Users in the Safe365 account.
Some examples of these Actions could be:
- Reviewing Documentation
- Making changes to processes
- Reminding of tasks
These Actions will sit directly in the question you've assigned it to, but it will also be available in the Workspace Tab.
To add an Action to an Assessment Question:
- Click into an Element.
- Click ‘Add Action’.
- Fill out the Action Details and Assign to a user.
The assignee will be notified with the Action.
Common Support Resources:
Safe365 Resources
Once the assessment has been completed, the system will automatically provide you with resources to help you continuously improve over time.
These resources are based off the assessment responses.
How to Access Safe365 Resources
Once you've completed the Safe365 Maturity Assessment the system provides you with resources to help you improve your Health and Safety Capability and Culture over time.
To access Resources from the Safe365 Assessment:
- Click into an element on the Safety Culture Assessment.
- Expand the ‘Actions to Improve your Rating’ section for the resource you need.
- Download the document.
These templates can be edited to meet the specific needs of your Organisation.
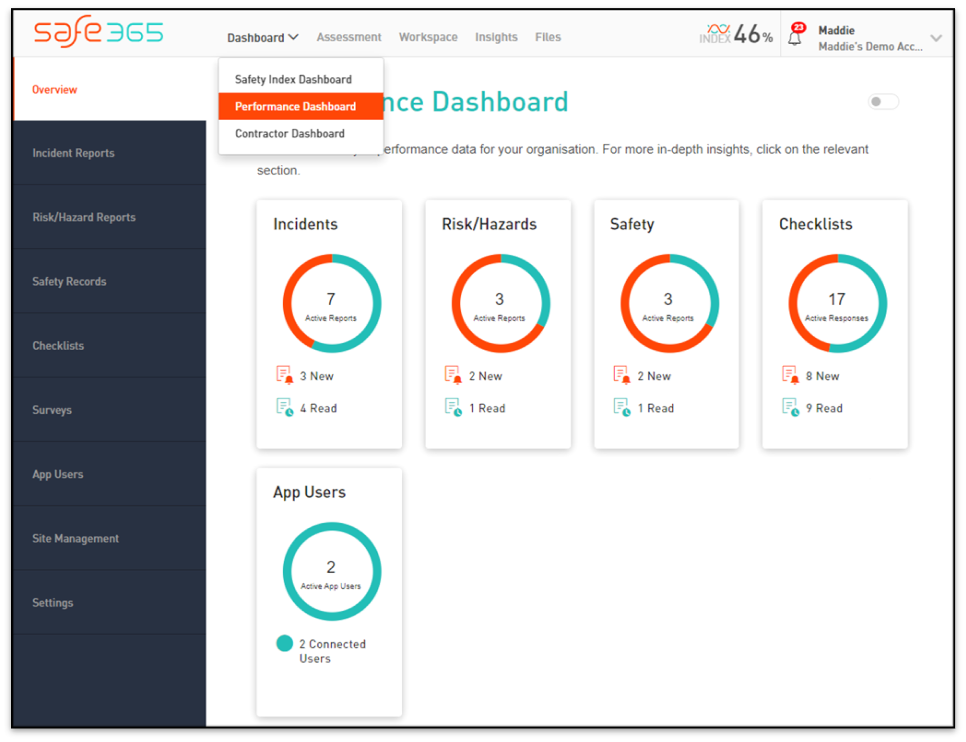
Performance Console
The performance console is the connection with your workforce.
Staff using the Safe365 app can report incidents, and risks and can complete checklists, and all of this data is reported to the performance console.
From here you can review and complete any required actions for any of the submissions.
Checklists
Checklists can be built for any area of the business - not just health and safety.
We have examples of forklift operators completing a daily prestart checklist, or office managers completing a checklist for the monthly audit of the first aid equipment.
Each specific checklist has all the submissions to it similar to Incidents and Risks.
How to Create a Checklist
Within Safe365 you can create Checklists for anything you require. These can be daily vehicle or machinery checklists, or monthly office or safety checks, through to inductions.
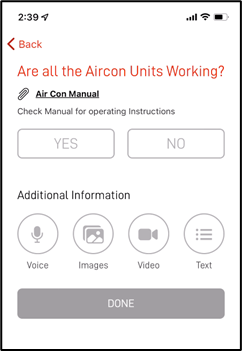
Checklists can be completed from the Safe365 app, and can be accessed from within the app, or via QR codes.
Checklist Answer Types Explained
Checklist Answer Types Explained
There are a range of Answer types you can use within your checklist. We explain each type below.
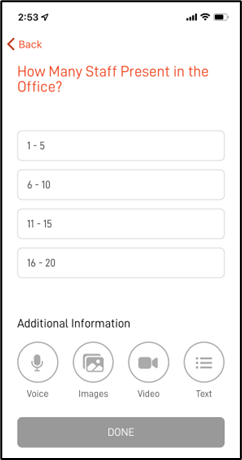
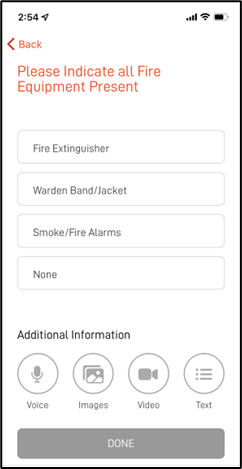
All checklist answers have the ‘Additional Information’ section where the user can enter in extra or supplementary information as required.
Yes/No
This is a simple Yes/No option.
 |
 |
Yes/No with Escalation on No response
This uses the escalation functionality when a No answer is selected. This is activated by adding a No Meaage when creating the checklist. Where a user selects No, it will prompt an email to be sent to the Escalation Notification group, and display the No Message
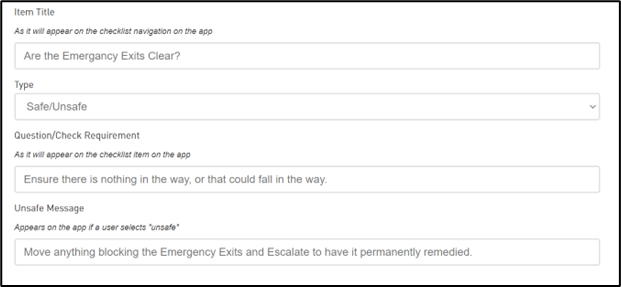
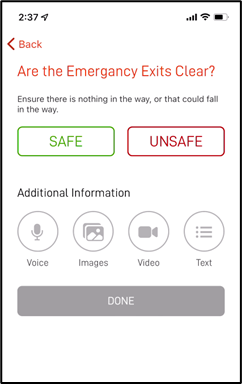
Safe/Unsafe
This gives the user the options of Safe and Unsafe.
When a user selects Unsafe, it will prompt an email to be sent to the Escalation Notification group and also display the Unsafe message.
 |
 |
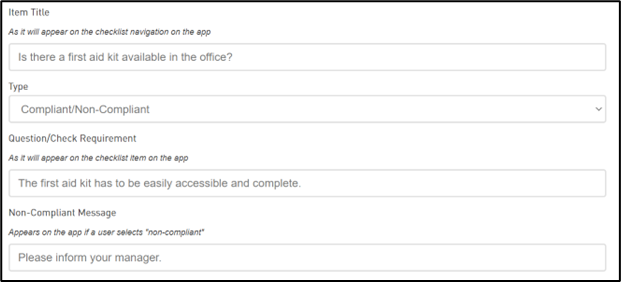
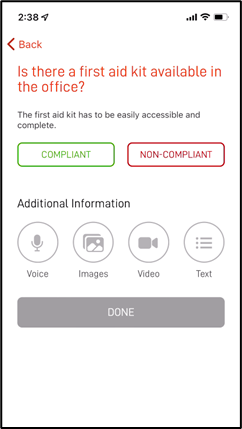
Compliant/Non-Compliant
This gives the user the options of Compliant and Non-Compliant. Where a user selects Non-Compliant, it will prompt an email to be sent to the Escalation Notification group, and also display the Non-Compliant message
 |
 |
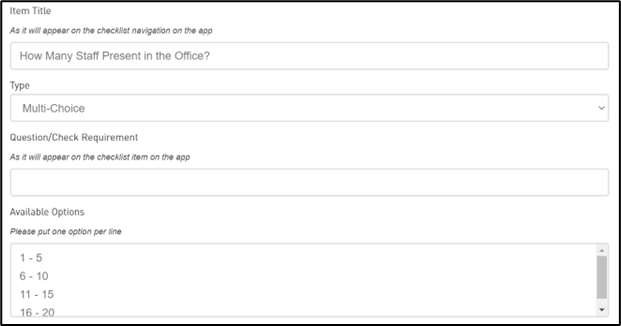
Multi-Choice
This gives the user a list of options to select from, where only one option can be picked.
There must be options available, or the checklist will not be able to be completed.
 |
 |
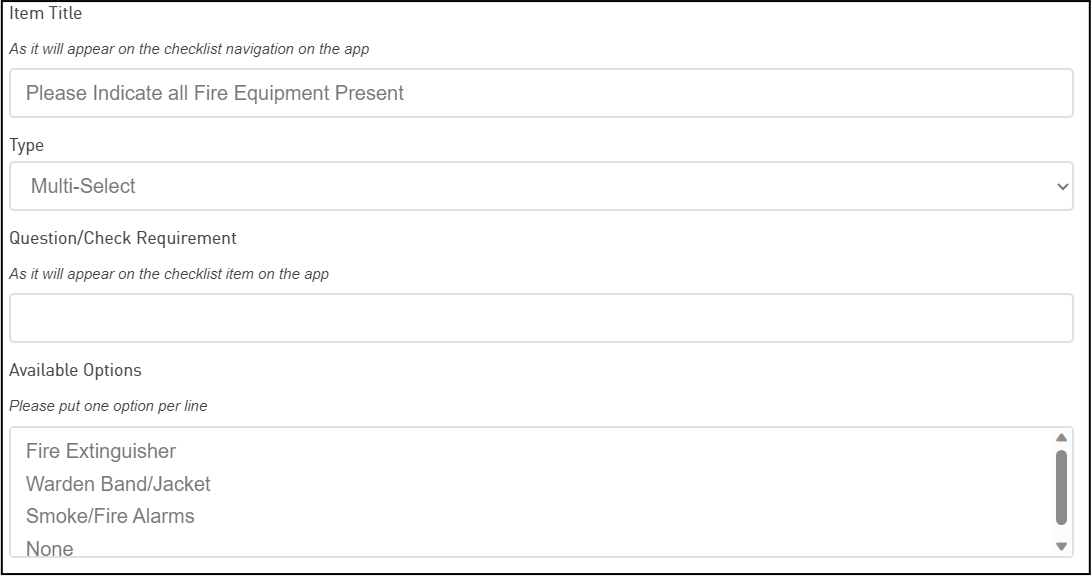
Multi-Select
This gives the user a list of options to select from, where multiple options can be selected
There must be options available, or the checklist will not be able to be completed.
 |
 |
Text/Audio/Image/Video
This requires the user to answer the question with the respective option.
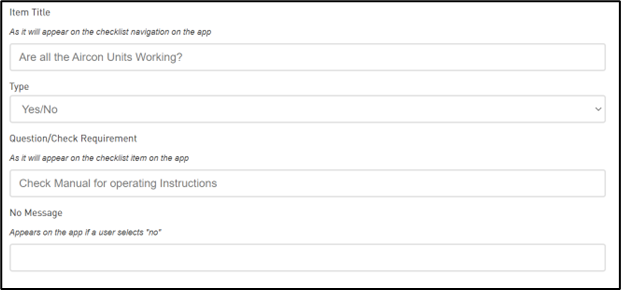
To Create a checklist:
- Head to the Performance Dashboard.
- Click into Checklists.
- Click 'Add New +'.
- Enter a Title for the Checklist, and a Description if required.
- Under ‘Checklist Content’ click ‘+ Add New’.
- Enter the Title of the question or check.
- Select the 'Type'. Refer to Checklist Answer Types Explained for more information.
- Enter addition context or requirements for the check/question.
- Click the ‘Tick’ to confirm the question.
- Repeat to load in all your questions.
- Click ‘Save’.
When the Checklist is ready to be used, Activate the Checklist to make it available within the App.
- On the Checklist, click on ‘Options’.
- Click ‘Activate’.
All other guides for these checklist features can be found in our Checklist section of our Help Centre.
Incidents, Risks and Safety
Incident reports, Risk/Hazard reports and Safety Records are reported by staff and appear under their respective sections. The function and flow of these three elements is the same, so the details outlined show for Incidents, but are the same for Risks and Safety observation.
Details of submissions can be viewed by clicking on the specific entry.
This shows the information that has been entered by the worker via the Safe365 Smartphone App.
Guides for using the Safe365 app can be found here Safe365 App
All other guides for these features can be found in our Workforce Connect section of our Help Centre.
Insights
In the reports centre you can produce three different types of reports for your organisation.
Assessment Report
Provides an overview of the Safety Index and performance information, that can be presented to the board.
The report highlights the top 3 elements that should be focused on for each module.
It also gives you the ability to input any key statistics and a summary of those statistics that form.
Safe365 Assessment Report
You can produce an overview of the Safety Index and performance information, that can be presented to the board or Health & Safety Meetings.
The report highlights the top 3 elements that should be focused on for each module for continual improvement.
It also gives you the ability to input any key statistics and a summary of those statistics that form your regular Health & Safety reporting.
To Generate an Assessment Report:
- Click into ‘Insights’ from the top menu.
- Click ‘Create Assessment Report’.
- Complete the 'Executive Summary'
- Enter details into the Key Stats and Summaries that wiill show within the report.
- Click ‘Generate Report’.
- Once it has finished generating, download the report.
- Ensure to Publish the report once you have it finalised, to keep a record of all your activites over time.
Power BI Report
There is the ability to download a Power BI token within Safe365 to take a further look into the information that is being submitted through the Safe365 App.
Download and Set Up Power BI Reports
This guide takes you through setting up Power BI for the first time.
Generally, the reports will fail to load at the first attempt. Click Refresh to let it load a second time. But as this wont be the same for everyone, we also have a guide on some common reasons why it does not refresh here.
For the steps to download and set up Power BI, we highly recommend you view the article with the steps below.
If you have previously set up Power BI, then you only need to refresh your token moving forward. Please find these steps here - Renew your Power BI Token
Benchmarking Report
Safe365 Benchmark Report
Safe365 provides benchmark data based on Industries.
This can be used to see how your Safety Maturity Index relates to industry benchmarks.
To download the Benchmark Report:
- Click ‘Insights’ from the top menu.
- Click ‘Download Benchmark Report’.
Files
In the files section you can upload documentation relating to your health and safety practices.
Examples of what could go on here Is evidence of the justifications for answers from the maturity assessment, or more generally files relating to your health and safety processes.
How to use Safe365 Files
The Safe365 Files section is completely blank when you start your subscription. This feature can be used in any way to help you store relevant information in one place.
Folders can be created in here for different areas of your business, i.e. assessment modules, SSSP, JSA, Policies & Procedures.
All Standard Users and Administrators can access these files on the system.
If you want to edit and make changes you have to do this off the Safe365 system.
How to Create a Folder within Files
Safe365 has a section where files can be held. These are only accessible to Administrator and Standard Users, and are not available through the Safe365 App.
To Create a Folder:
- Click into ‘Files’ from the top menu.
- Click on ‘Add Folder’.
- Give the folder a name.
- Click ‘Add’.
You can use the ‘Upload Files’ option to select a file from your PC to upload.
Workspace
All users have a workspace that is specific to them, that shows their assigned actions.
As an admin, within your workspace, you can view all the actions within the organisation.
Within Workspace you can also create new actions.
Learn more about Safe365 Workspace
Workspace is a great tool to manage all your actions for your team.
Actions are available throughout the entire platform.
Once Actions have been created the system will automatically notify users that are assigned to the action.
Our full guide shows everything you need to know about the Workspace.
Full Actions User Guide
Actions Overview
Within Safe365 you can create Actions and assign these out to any user within your organisation. Actions can be created from many places within Safe365 which we will highlight in this user guide. Actions can be created for any work item that needs to be completed, either as a one off or repeating.
Actions Dashboard
As an admin, you will be able to see all Actions assigned out to all users. You can then filter this by deadline, priority, status and user as shown below.
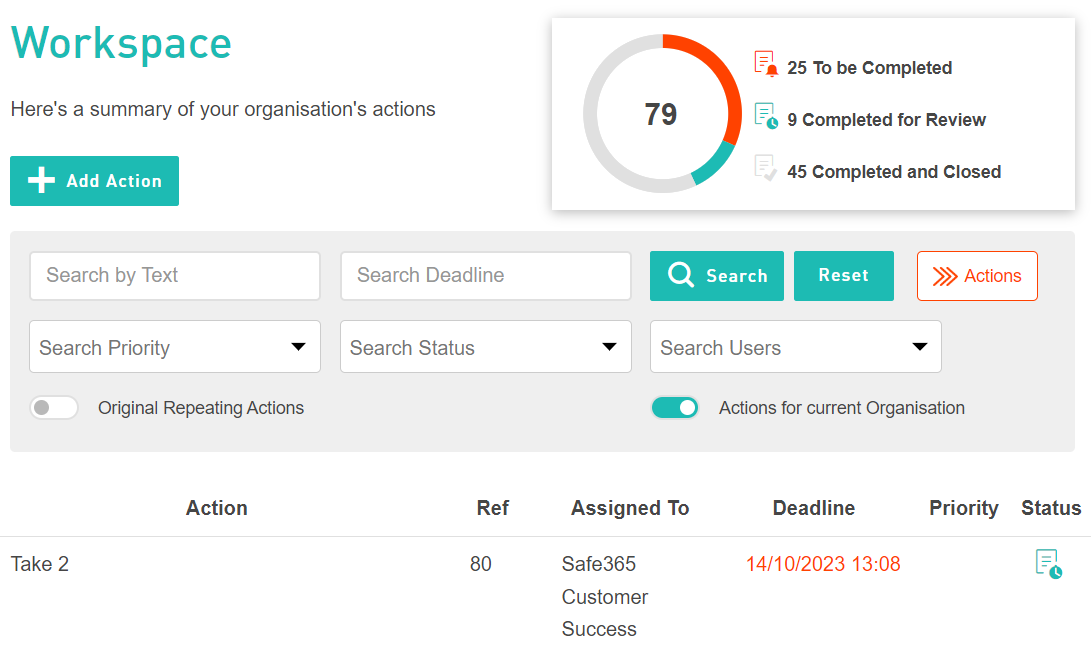
Original Repeating Actions
When this is toggled on, it will then display those actions that are set to repeat, where these can be edited or changed as required. This doesn’t show the instances of the repeated actions.
Actions for Current Organisation
When this is toggled on, you will only be shown actions for the current organisation you are in. Vice versa when this is off you will see all actions owned or assigned to you from any Safe365 organisation.
Workers View within Safe365 Web Portal
All workers can now access Safe365 from the web. Interacting with Actions can be done in the web portal, so we have created a dashboard and workspace for the worker role.
Workers will still have full access to the Safe365 smartphone app, but now they can also create and complete actions, and lodge Incident reports from the web.
How to Create Actions in Safe365 Workspace
Actions can be created throughout the Safe365 System. The centralised place for Actions is inside Safe365 Workspace. Here, you can also create Actions and assign them out to users in the system.
Creating an Action in Workspace
How to create an Action
How to create an Action:
- Click into ‘Workspace’.
- Click ‘Add Action’.
- Enter a ‘Title’.
- Enter a ‘Description’ explaining what the user needs to do.
- Click on ‘Assignee’ and selecct user/s to assign the Action to.
- If required, enter a ‘Deadline’ and/or 'Priority.
- Click ‘Add Action’.
Action Tags Explained
Action Tags Explained
When creating an Action across the platform you will see multiple action tags available, this guide explains the different tags and how you can use them.
Setting up a Repeating Action
Across the meta-tags you can set up a Repeating Action. This can be extremely beneficial for reminders in the upcoming months and years.
Examples of repeating actions can be, vehicle checks, office checks, plant & equipment checks etc.
Setting up a Repeating Action
Actions within the Safety Index
In the Maturity Index, Actions can be used as reminders for tasks in the upcoming months.
When in the maturity assessment you will see the Actions button available to create an Action right inside the question.
How to add an Action in the Safe365 Maturity Assessment
Adding an Action in the Safe365 Maturity Assessment
You can set up Actions within your Safe365 Maturity Assessment, these could be reminders or tasks. These Actions can also be assigned to other Users in the Safe365 account.
Some examples of these Actions could be:
- Reviewing Documentation
- Making changes to processes
- Reminding of tasks
These Actions will sit directly in the question you've assigned it to, but it will also be available in the Workspace Tab.
To add an Action to an Assessment Question:
- Click into an Element.
- Click ‘Add Action’.
- Fill out the Action Details and Assign to a user.
The assignee will be notified with the Action.
Actions within a Submitted Report
This feature is also available in the Performance Console, meaning you can create Actions directly into the reports being submitted by users.
Actions can be used for follow up actions from these reports.
How to create an Action inside an Incident Report
Create an Action inside an Incident Report
Safe365's Action feature is available throughout the entire platform. When investigating a Report you may find some follow up Actions need to be taken, this feature will allow you to notify other Users in your Safe365 account to complete tasks.
How to add Actions within a Report:
- Navigate to the Performance Dashboard
- Click through to the Report.
- Under ‘Actions’, click ‘Add Action’.
- Complete the Action details, and Assign to a User.
- Click ‘Add Action’.
The Action will be saved, and you can view it within the Report, and under Workspace.
Admin Functions
Most of the admin functions can be accessed via the Admin Menu. The admin menu is the top right corner under your name.
Inviting New Users
How to Invite a User to your Safe365 Account
If you are an Administrator in your Safe365 account, you have the ability to add users. All you need is their email address.
When adding a new User, you need to select their ‘Role’, these are explained below.
Safe365 User Roles Explained
When a user is invited in, need to have a role assigned to them. Below is an explainer of the different roles and the likely ‘persona’ of each role. User roles can be updated at any time.
Administrator
This is likely the role for a Health & Safety Manager.
- This role has access to all products of Safe365 for the organisation.
- This role also includes the ability for maintaining subscription and billing information
- This role can add, remove and edit other users within the organisation.
- This user is able to Edit, Convert, and Delete submitted reports within the Performance Dashboard.
- This role has the same reporting functionality as a Worker.
Standard User
This is likely a Health & Safety Rep role.
- This role has access to all products of Safe365 for the organisation.
- This role can view all information within the Performance Dashboard, and Safety Index.
- This role has the same reporting functionality as a Worker.
- They do not have access to the subscription information
- They do not have the ability to add or remove or edit users.
- This user cannot Edit, Convert or Delete information from the Performance Dashboard.
Worker
This is the role for any staff member/employee who needs to report information in only.
- This user can use the Safe365 Mobile App to report Incident, Hazard, and Safety Reports, and complete Checklists.
- This role is able to submit Incident, Hazards and Safety Reports from the Web. They can also view their submitted reports within the Web.
Viewer
This is likely the role for a Board Member or similar.
- This role only has read-only access to the Safe365 Safety Culture Assessment.
You can follow our guide on How to invite a User.
To invite a new user:
- Click into the Admin Menu, top right under your name.
- Click into ‘Users’.
- Click on ‘Invite a User’.
- Enter the users email address to be invited.
- Select their Role. See Safe365 User Roles Explained - Safe365 (safe365global.com)
- Click ‘Invite’.
Note - Invites expire after two weeks.
Update Payment Information or Subscription
From the admin menu, you can update your subscription and billing in this tab. Here you can also update payment information, download invoices and change your plan.
How to Update Your Credit Card
To Update your Credit Card:
- Click into the Admin Menu, top right under your name.
- Click ‘Subscription & Billing’.
- Click ‘Modify Payment Info’.
- Enter the new card details.
- Click ‘Update Payment Info’.
Note: The payment method is per subscription. If you have multiple subscriptions, you will need to update them all. You can select your subscriptions from the left-hand menu when in ‘Subscription & Billing’.
Safe365 Smartphone App
The Safe365 app can be downloaded from the Android or Apple app store and users can use this app to report incidents, hazards, complete checklists and much more.
Here is the guide for all app functions.
Full App User Guide
Full Guide for using the Safe365 App
How to use the Safe365 App
The Safe365 App provides the workflow for Incident Reporting, Hazard/Risks Reporting and Safety Observations.
This guide shows you how to enter information into each workflow.
Complete an Incident Report
Submit an Incident Report from the Safe365 App
An Incident report should be submitted after anything happens to incur injury or harm within the Workplace.
Complete a Risk/Hazard Report
Submit a Hazard Report from the Safe365 App
Health and Safety is a collective responsibility. Report anything you see that could cause harm or injury within the Workplace.
Complete a Checklist
Complete a Checklist on the Safe365 Mobile App
All Safe365 checklists are completed on the mobile app, below is a quick guide of how to do this on the app.
Complete a Safety Observation
Submit a Safety Observation from the Safe365 App
Within the Safe365 mobile app you can report safety observations.
When creating a Safety Observations, you can select from users who completed this with you, or who the report is about.